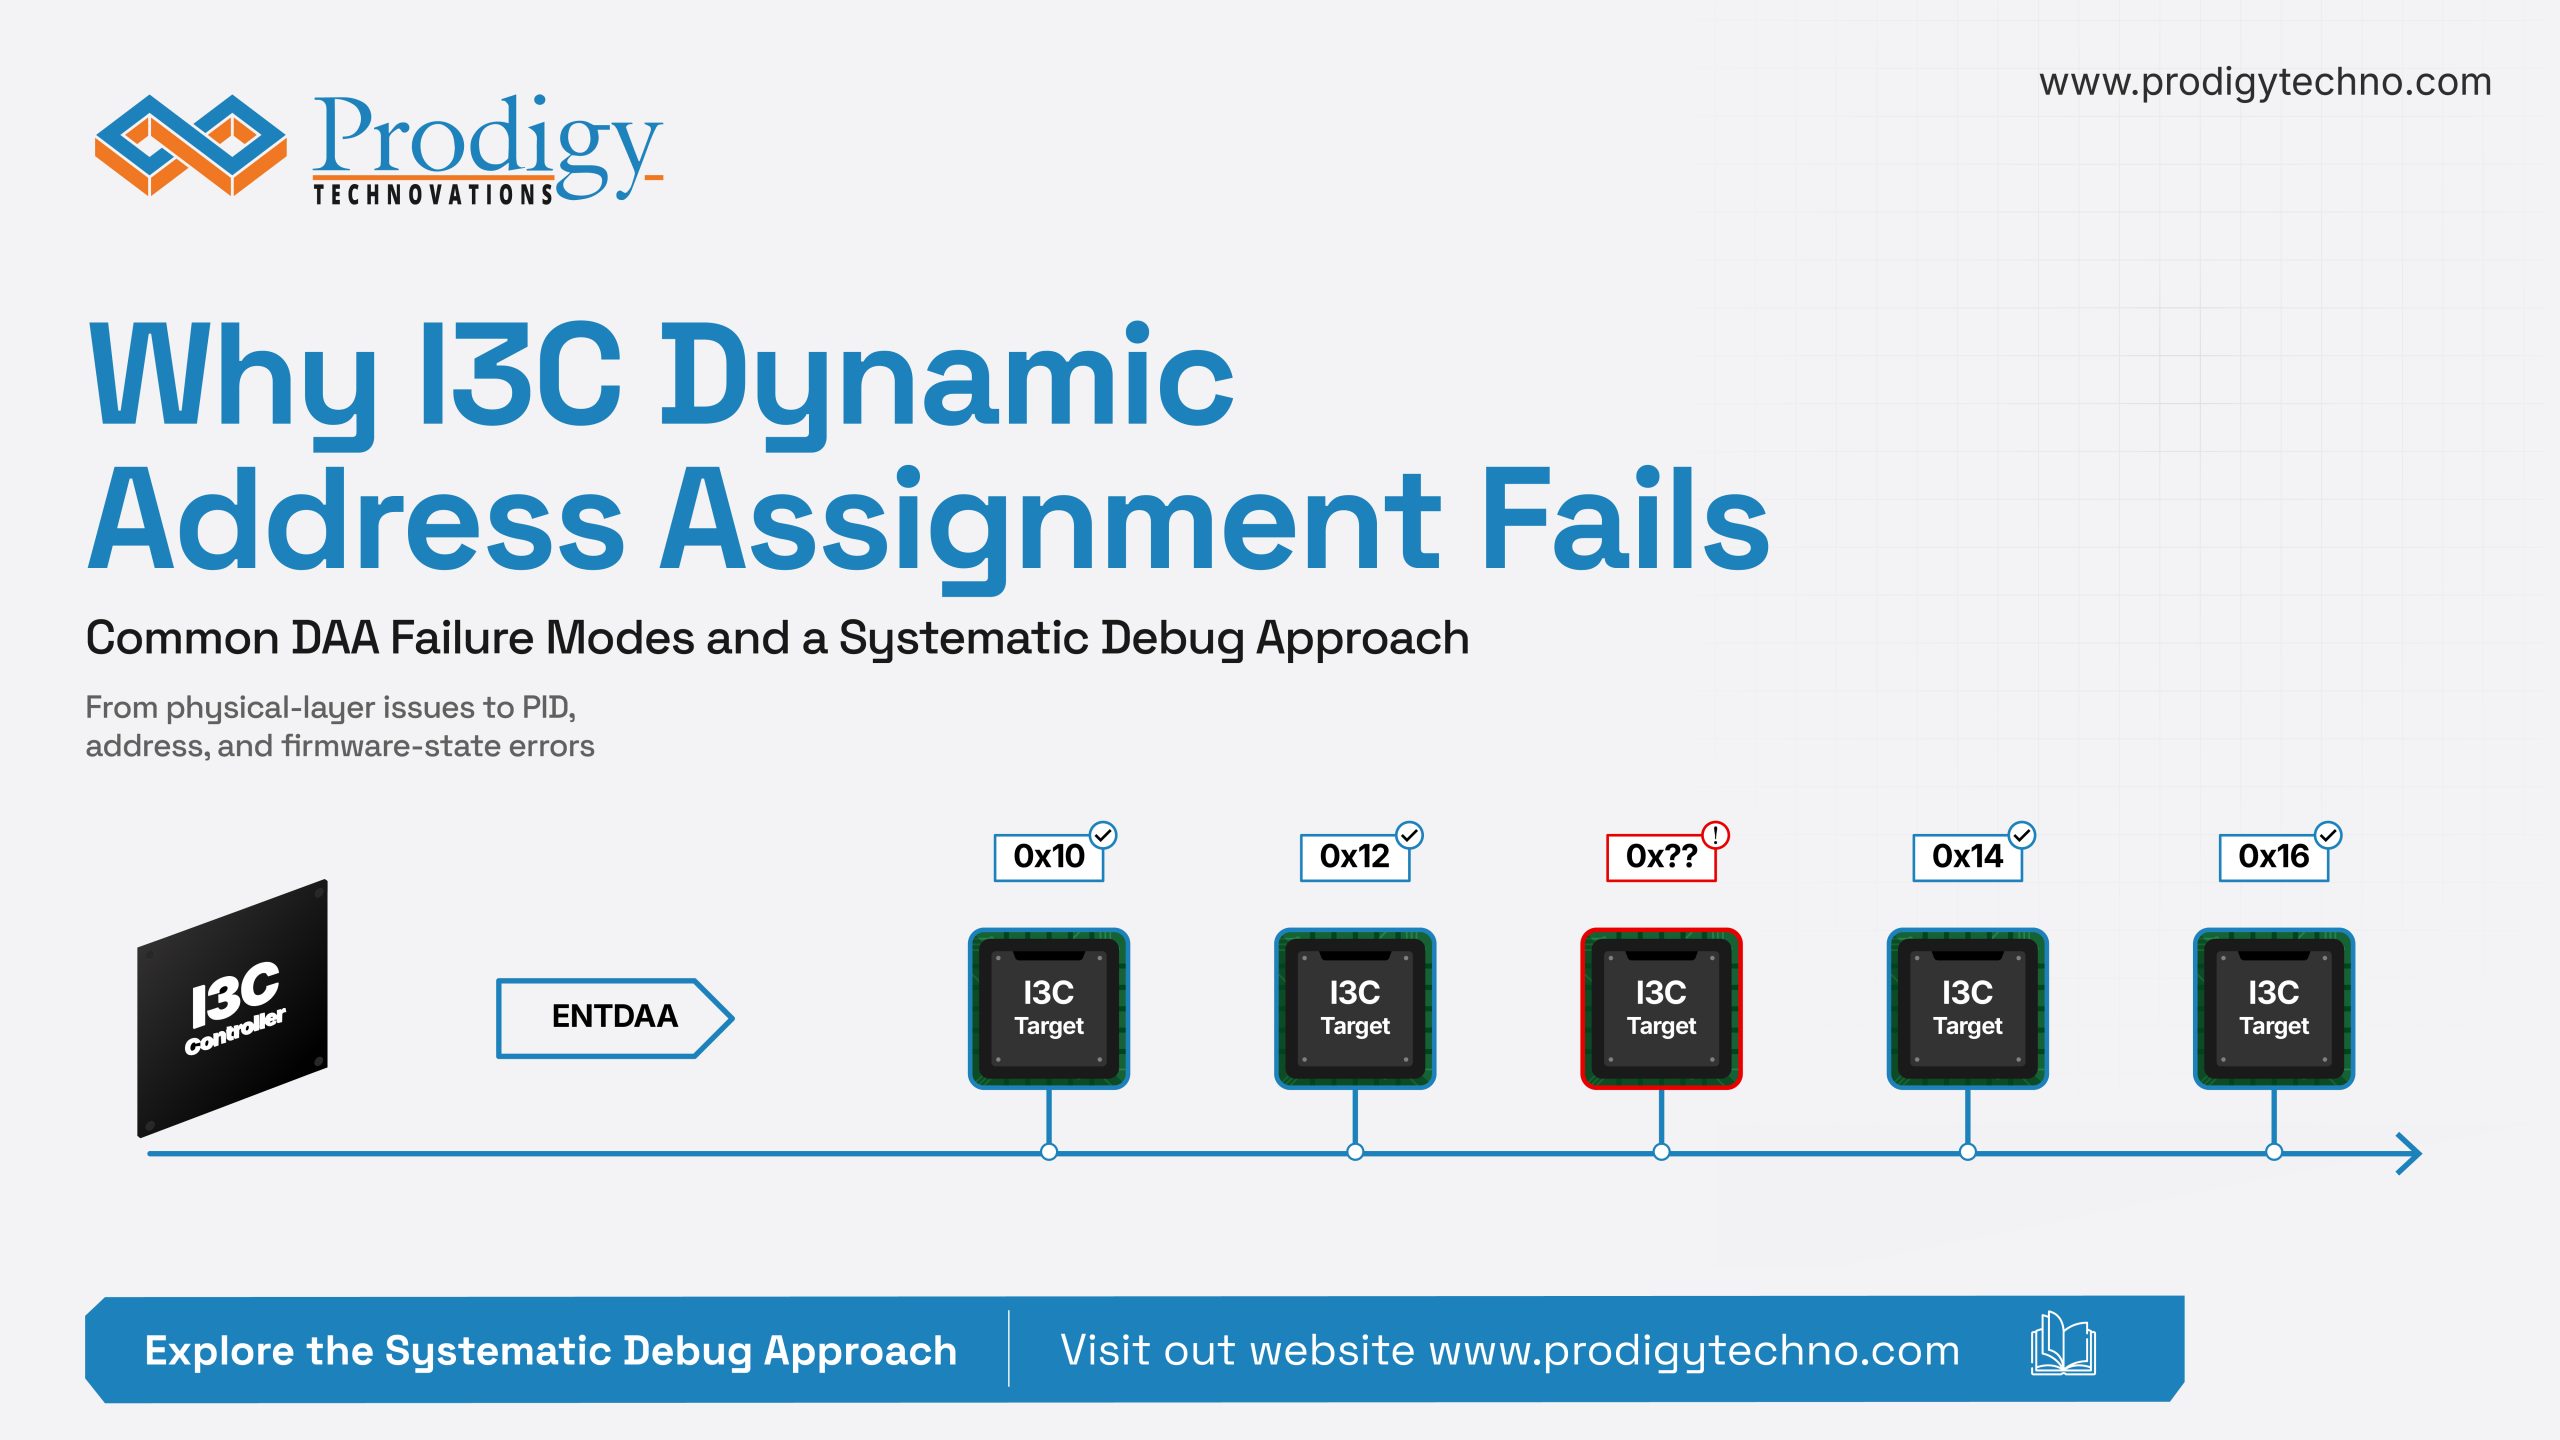
Dynamic Address Assignment, or DAA, the process by which an I3C controller assigns unique addresses to every device on the bus, is one of I3C’s most powerful features. It’s also one of the most common points of failure during bring-up. DAA is highly timing-sensitive and dependent on both protocol correctness and electrical integrity. A single issue can cause the entire sequence to fail. What makes these failures especially difficult to debug is that DAA failures are often silent. Devices may simply disappear from enumeration, fail to receive an address, or intermittently respond during bring-up, leaving engineers with little indication of where the breakdown actually occurred. Here, we’ll cover the most common DAA failures, how to systematically debug them, and what good visibility into the process actually looks like.
What Can Go Wrong During DAA
DAA failure in I3C? PID collisions, invalid PIDs, timing issues, and device readiness are some of the most common hidden causes. Identify them faster and simplify debugging.
The I3C address assignment process often encounters lots of failures. And when it fails, the symptoms are rarely obvious. Here are the most common failure modes:
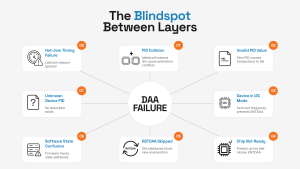
- PID collision: If two identical chips share the same Instance ID, both transmit identical bits during arbitration. The controller assigns one address, and the second device becomes invisible.
- Invalid PID value: Every I3C device’s 48-bit Provisioned ID must be non-zero. If it isn’t, ENTDAA will still assign a dynamic address. But any subsequent read or write transaction to that device will fail.
- Device still in I2C mode: ENTDAA only works with devices operating in I3C mode. If a device hasn’t transitioned out of I2C mode, either because the bus frequency isn’t configured correctly or because the target’s I3C mode hasn’t been enabled as per its datasheet, it won’t respond to ENTDAA at all.
- Chip not ready: A device may still be powering up or in a sleep state when ENTDAA arrives. The controller doesn’t flag this. It simply finishes DAA with fewer addresses assigned and moves on.
- RSTDAA skipped: Devices holding addresses from a previous power cycle won’t participate in a new DAA sequence. They already have an address and ignore the request.
- Software state confusion: RSTDAA clears hardware addresses, but if firmware doesn’t clear its internal tracking tables, the driver still assumes old addresses are valid. Any re-assignment gets blocked.
- Device not in the known list: DAA assigns an address successfully, but the software has no descriptor for that device because its PID wasn’t registered in the device tree or firmware configuration.
- Hot-Join timing problems: A Hot-Join device signals its presence after DAA has completed. If Hot-Join events aren’t enabled via ENEC or the interrupt handler is busy, the request gets ignored, and the device stays unaddressed.
Tools You Need to do I3C DAA Debug
DAA debugging requires visibility at two levels, the physical signal and the protocol. These three tools cover both.
A Logic Analyzer
A logic analyzer shows you the digital signals on SCL and SDA decoded at the protocol level. For DAA debugging, this means you can see exactly what commands were sent, if the devices responded, what PIDs were transmitted, and whether addresses were correctly assigned.
An Oscilloscope
An oscilloscope shows you the actual analog waveform, which matters when the failure is physical.
Slow rise times, ringing on signal edges, or incorrect voltage levels won’t show up in a protocol decode. They only show up on a scope. If your logic analyzer shows a clean DAA sequence but devices still aren’t responding, the oscilloscope is where you look next.
A Protocol Analyzer and Exerciser
A dedicated I3C protocol analyzer actively participates on the bus.
In analyzer mode, it continuously sniffs all traffic, decodes every packet, timestamps every event, and flags protocol errors automatically. You see the entire DAA sequence laid out clearly like the PIDs received, addresses assigned, and ACKs and NACKs without manually interpreting waveforms.
In the exerciser mode, it can replace either side of the bus entirely. If you suspect your controller is mishandling ENTDAA, swap it out. Let the exerciser act as the controller and watch how your target devices respond. If you suspect a target device, do the opposite. This ability to isolate one side completely shortens a debug session by a lot.
How to Debug a DAA Failure
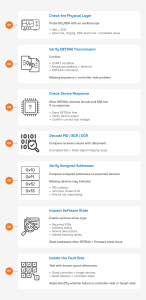
Follow this 7-step checklist to quickly diagnose and resolve I3C Dynamic Address Assignment (DAA) failures, from physical layer validation to software state analysis.
Work through these steps in order to systematically debug the I3C address assignment process:
Step 1: Check the physical layer first
Probe SCL and SDA with an oscilloscope before touching any software. Both lines should sit at VDD when idle. Look for slow rise times, ringing, or overshoot. If SDA is held low at idle, a device is stuck in a fault state. Fix this first.
Step 2: Diagnose the ENTDAA failure
Connect a protocol analyzer and trigger a DAA sequence, then confirm:
- A START condition is generated
- The broadcast address appears with a Write bit
- The ENTDAA command code follows
If you don’t see this, the problem is on the controller side.
Step 3: Check whether devices are responding
After ENTDAA, at least one device should pull SDA low. If not, check whether RSTDAA was sent first, then confirm all devices are fully powered. And then verify bus voltage levels match your target devices’ expectations.
Step 4: Decode the PID transmission
Take note of the PID, BCR, and DCR fields and compare them against the datasheet values for your target device.
Corrupted bits or inconsistent values usually point to signal integrity problems rather than protocol errors. This is where it helps to correlate the protocol trace with oscilloscope waveforms.
Step 5: Count the assigned addresses
After DAA, count the number of addresses assigned and compare it to the number of I3C devices you expect on the bus. If the count is short, you likely have a PID collision or a device that failed to respond. Check your Instance ID configuration for all identical chips on the bus.
Step 6: Check the software state
Use verbose logging in your I3C driver and inspect:
- Received PIDs
- Address assignment status
- Device descriptor initialization
- Internal address tracking tables
If the driver still reports addresses as occupied after issuing RSTDAA, the most likely cause is a stale firmware state.
Step 7: Isolate the side that’s failing
If the root cause is still unclear, replace one side of the bus with a known-good reference.
Run ENTDAA from a protocol exerciser against your target devices. If enumeration succeeds, the controller implementation is likely at fault. Then reverse the setup. Replace the target side and observe how the controller behaves against a known-good device model. Incorrect behavior here points back to the controller stack.
How to Eliminate the Avoidable Failures
You can’t eliminate every DAA failure. Some like silicon bugs, PID collisions at scale, and intermittent signal integrity issues can still surface. But you can work to prevent the avoidable ones.
1. Always issue RSTDAA before ENTDAA
All of the bus initialization sequences must start with RSTDAA. Devices having addresses from a previous cycle won’t be able to participate in DAA.
2. Configure instance IDs for identical chips
If multiple units of the same chip share a bus, their Instance ID fields must be set to unique values. Check the datasheet and assign them deliberately before bring-up begins.
3. Clear software state when you clear hardware state
Engineers reset the hardware state, but might forget about the firmware’s internal address-tracking tables.
If RSTDAA clears device addresses on the bus while the driver still believes those addresses are occupied, the next DAA cycle can fail in confusing ways. Clear both sides together.
4. Register every device’s PID before bring-up
An incorrect entry can break the whole enumeration flow for that device in stacks that rely on pre-registered PIDs.
Double-check that each PID entry maps to the correct hardware on the bus.
When DAA Fails, Visibility is Everything
When DAA fails, you usually don’t get an error. The real problem, therefore, is the lack of visibility into the process.
Good visibility means different things at different layers.
In the physical layer, there has to be clarity on whether the signal edges are clean and voltage levels are correct. At the protocol layer, it means seeing every ENTDAA command, PID transmission, and address assignment in a single correlated view.
And when you need to isolate whether the failure is in your controller or your target, it means being able to replace one side of the bus entirely with a known-good reference and watching exactly what happens.
Prodigy Technovations’ PGY-I3C-EX-PD is built for exactly this. It combines a full protocol analyzer and exerciser in a single platform. It decodes every DAA transaction in real time, overlays protocol data directly on SCL and SDA waveforms, and flags errors automatically.
Its exerciser capability further simplifies root-cause analysis by allowing engineers to emulate either side of the bus using a known-good reference.
For electrical and timing validation, Prodigy’s oscilloscope-based I3C Electrical Validation Software complements protocol analysis with detailed signal integrity and compliance verification.
In the end, successful DAA debugging is about making the failure visible enough to understand, isolate, and fix with confidence. And Prodigy’s PGY-I3C-EX-PD provides the exact visibility engineers need. Find out what more it can do for your I3C bring-up process.