
Somewhere on your PCIe bus, a device announced itself.
It sent an ID. It claimed a vendor. It asked to be trusted. And your system, without question, without verification, even said yes.
That approach made sense for a long time. Components came from known vendors, supply chains were shorter, and the threat model stopped at software. The hardware underneath was assumed clean.
That assumption doesn’t hold anymore.
Supply chains now span continents. A single server platform might pass through a dozen manufacturers before it reaches a rack. Disaggregated compute means more components and insertion points. Also, more potential points of failure.
The industry needed a way to verify hardware identity at the bus level. Cryptographically. Before the OS loads, the hypervisor initializes, or any workload touches the system.
That’s what SPDM does. A DMTF-standardized protocol that lets a host ask a component, “prove who you are,” and actually verify the answer. This is how modern hardware security is being built.
The Trust Problem in Modern Hardware
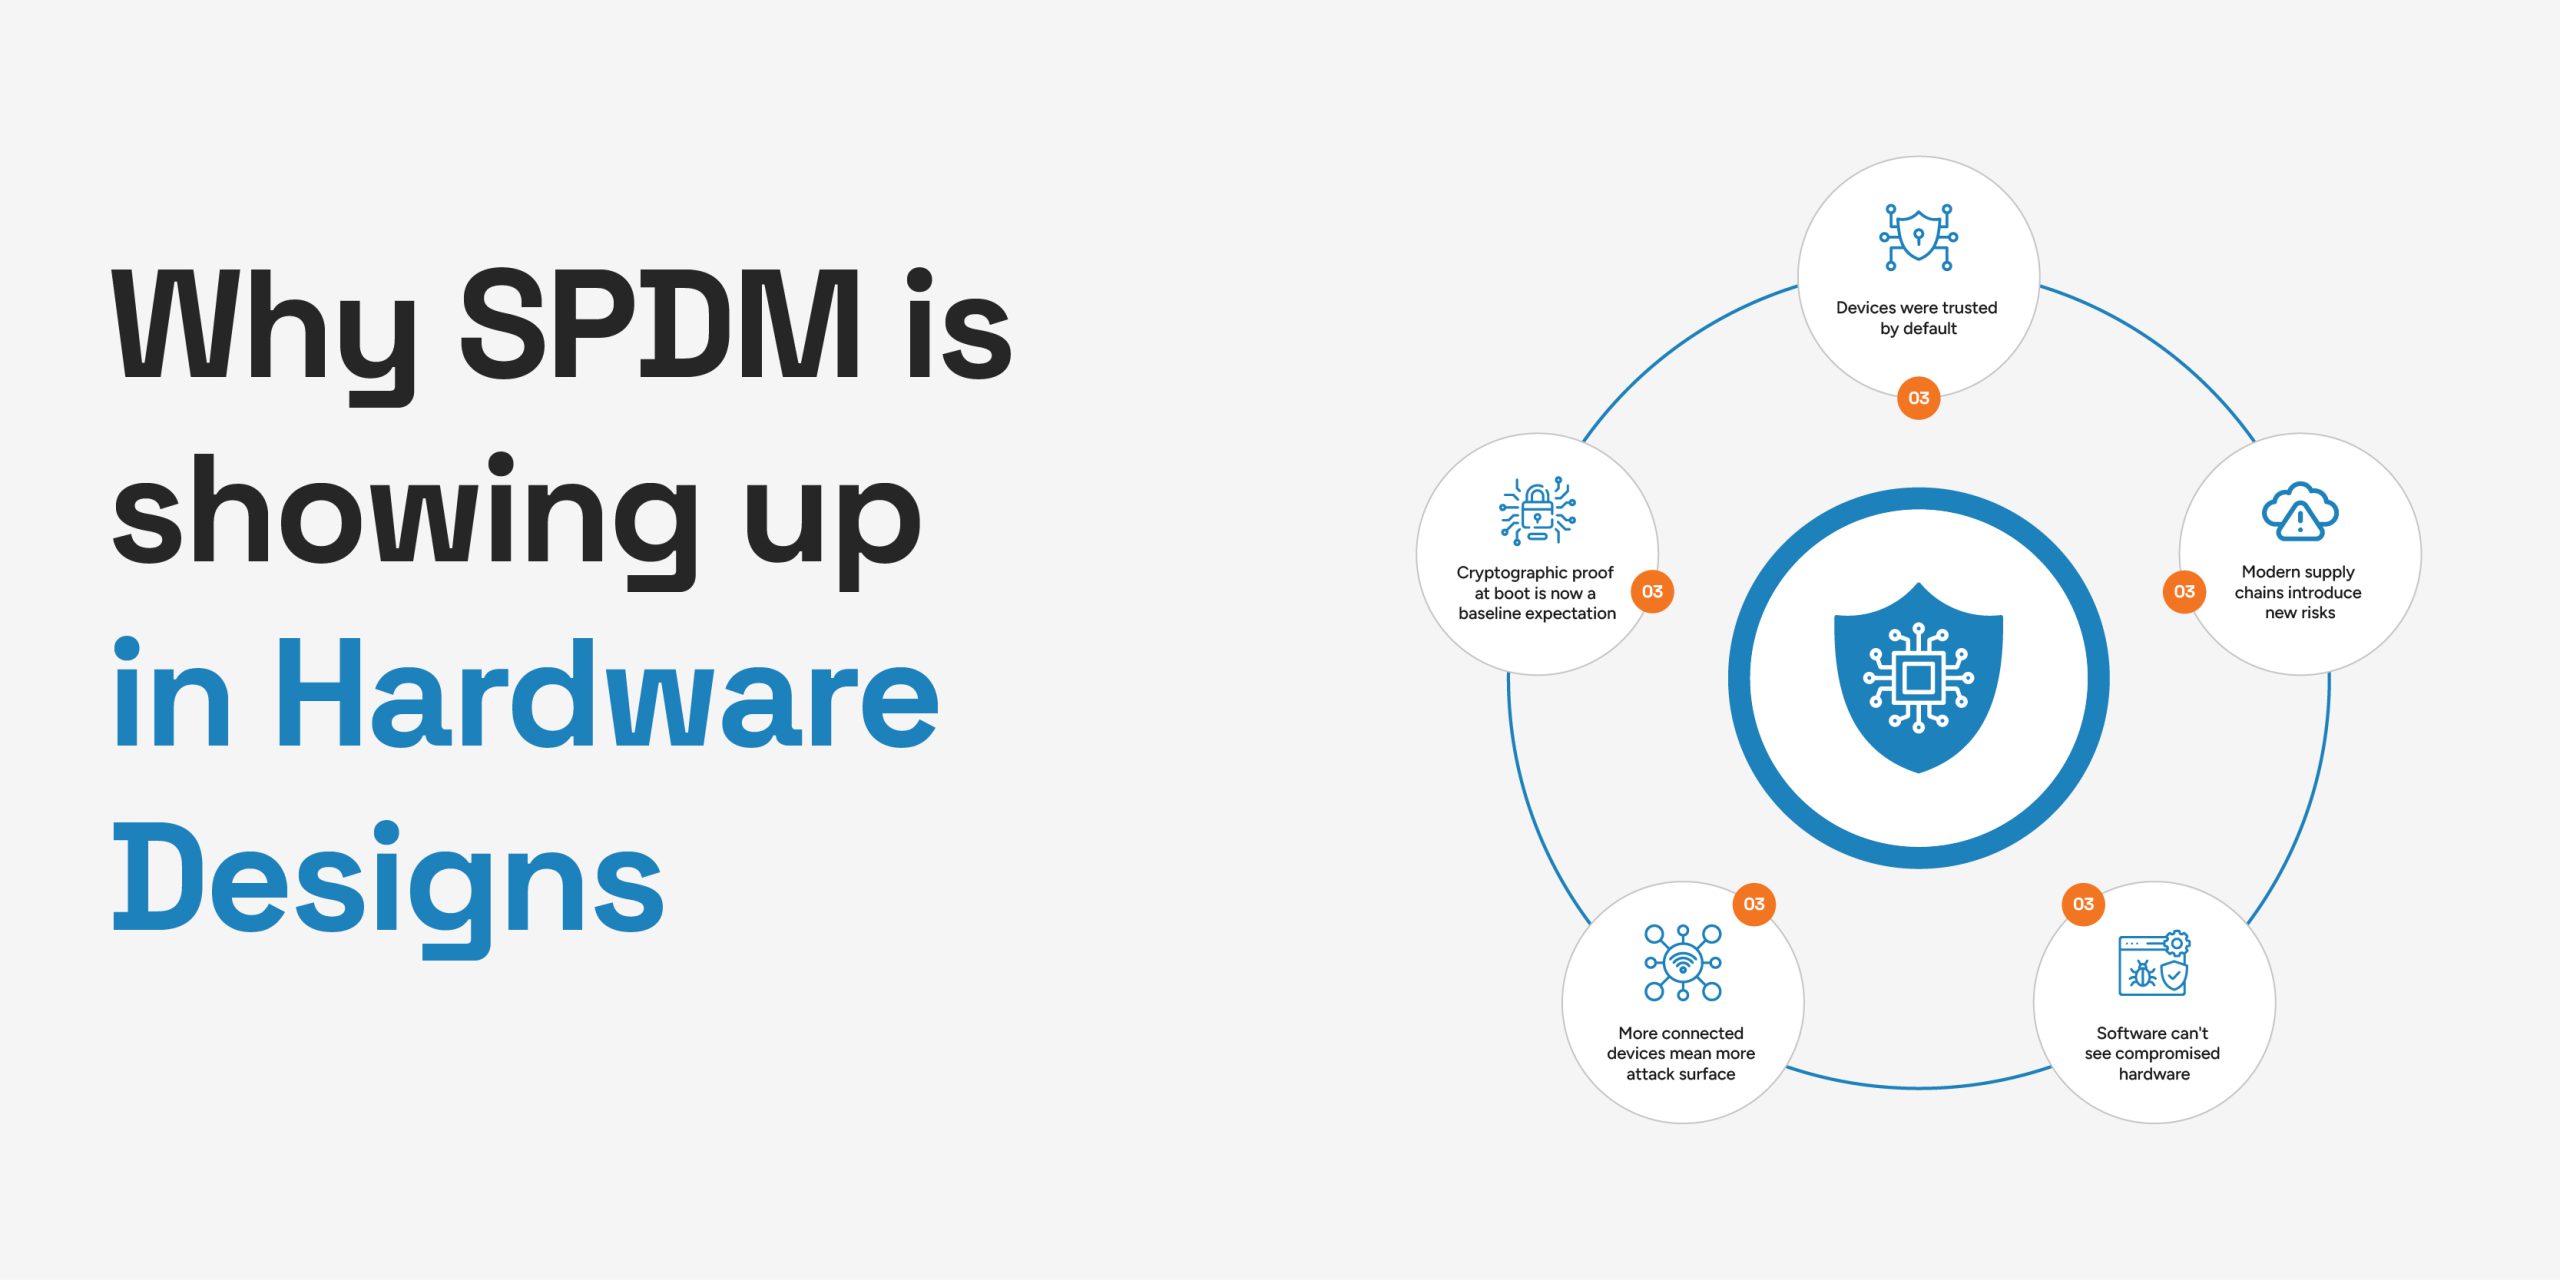
Modern servers don’t look like they used to.
A single rack unit today might have a GPU from one vendor, an NVMe drive from another, a NIC from a third. All talking to a host CPU over PCIe. Add CXL memory expanders, smart NICs with onboard processors, and a BMC quietly managing everything from the sideband. That’s not just one system. That’s a supply chain with a power connector.
And that’s the problem.
Each of those components goes through design houses, contract manufacturers, distributors, and integrators before it reaches your rack. At any point in that chain, something can go wrong.
The attack surface has moved. It’s now the hardware sitting underneath the OS, the hypervisor, or the firmware. The device that announces itself on the bus and asks to be trusted.
The OS has no way to verify that. Neither does the hypervisor. Without a dedicated protocol, the host has exactly one option. Take the device’s word for it.
What the industry needed was a way to answer three questions at the bus level:
- Is this device what it claims to be?
- Has it been tampered with since it left the factory?
- Can it be proved, cryptographically, right now?
That’s the gap SPDM protocol was built to close.
What SPDM is
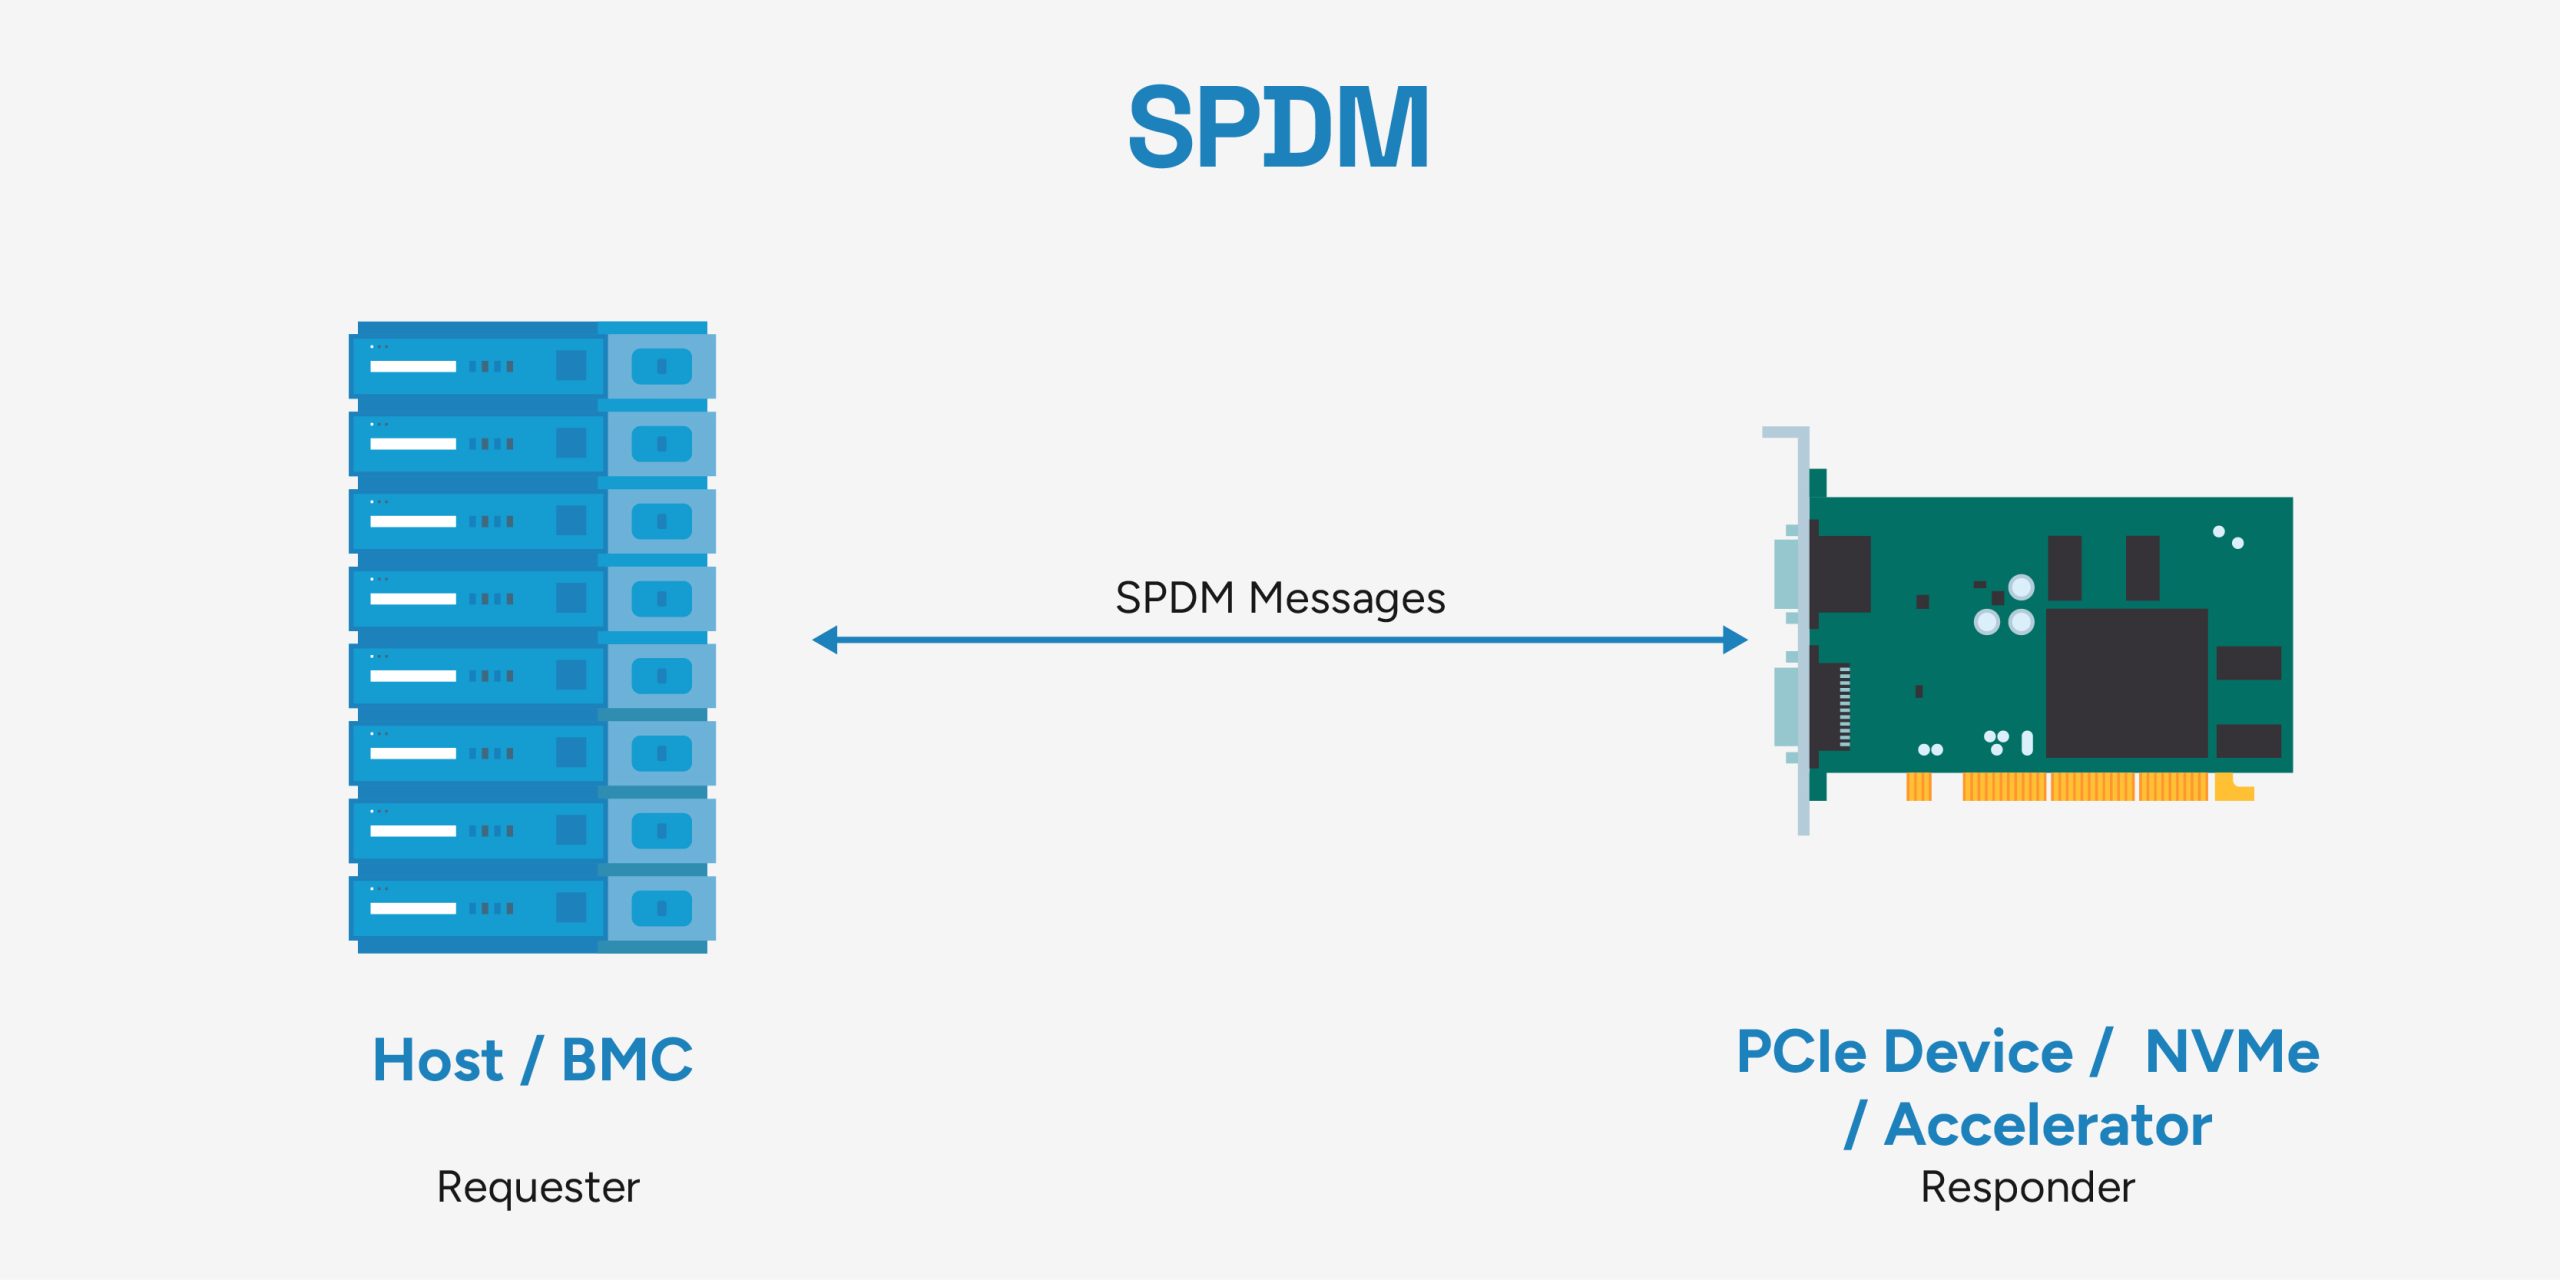
SPDM, or Security Protocol and Data Model, is a DMTF standard (DSP0274) that gives hardware components a common language for identity and integrity verification.
SPDM is basically a defined sequence of messages that lets one component ask the other about its identity and if it can prove the same.
The model is simple. A Requester initiates, a Responder answers. Typically, the host or BMC is the Requester. The PCIe device, NVMe drive, or accelerator is the Responder.
Three things this hardware security protocol handles:
- Authentication: Verifying device identity via certificates provisioned at manufacture
- Device Attestation: Verifying the device’s firmware and configuration haven’t changed
- Key exchange: Establishing session keys for protected messaging
The Protocol Beneath the Trust
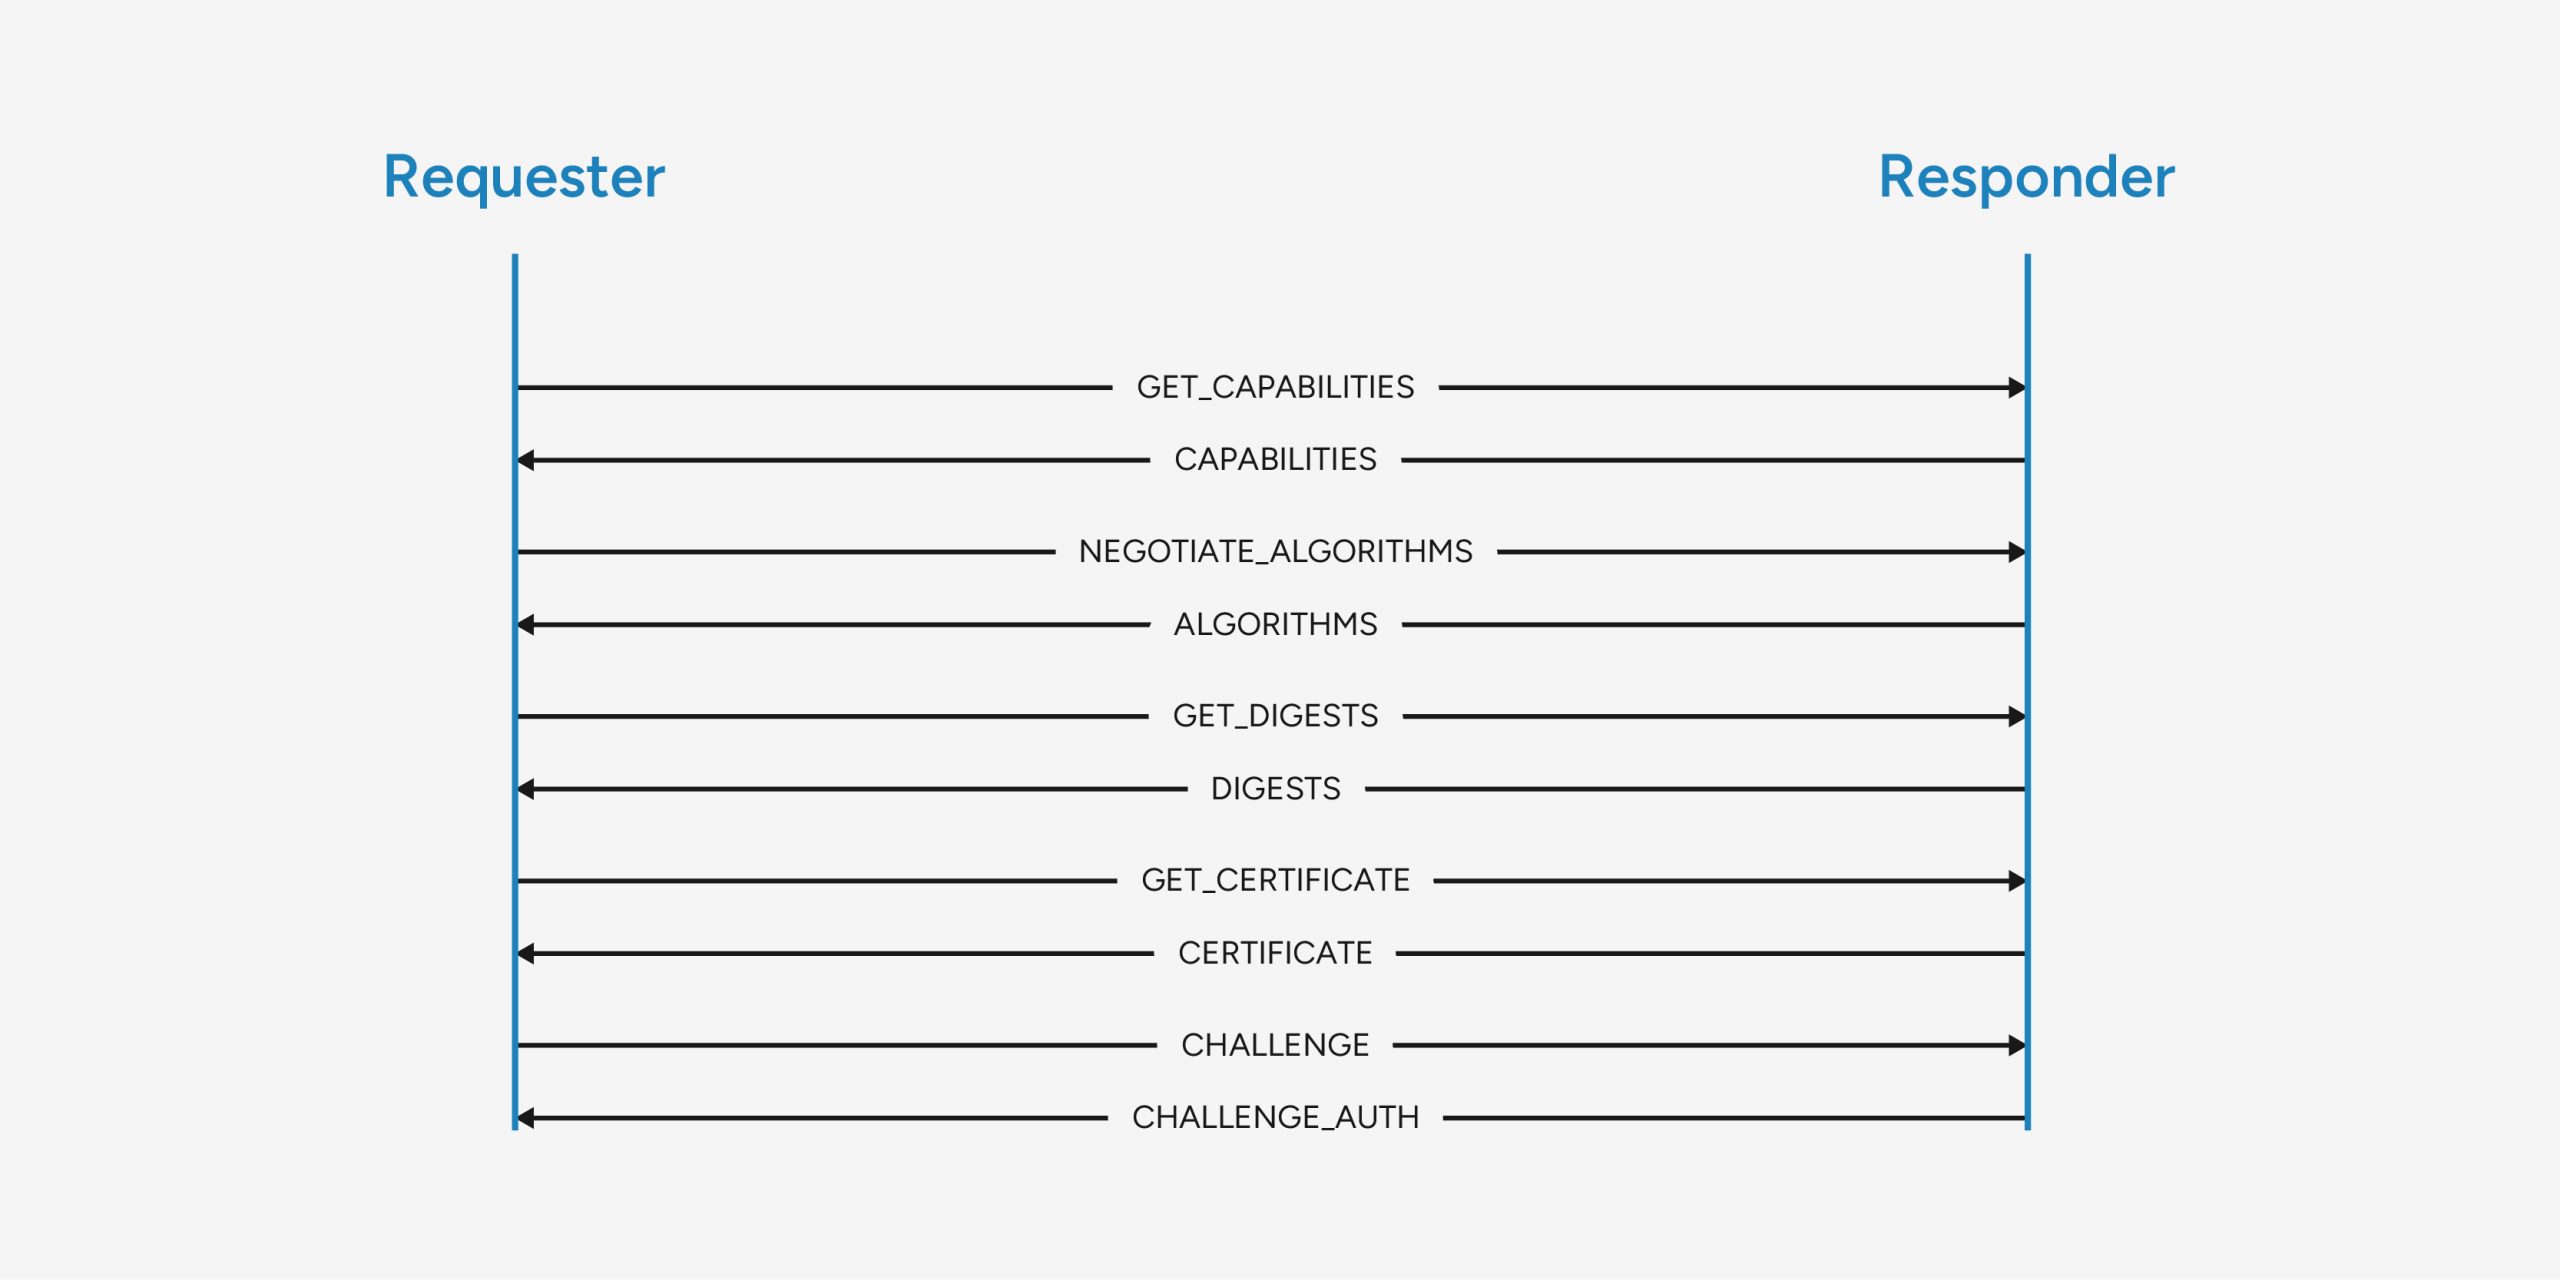
Every SPDM exchange follows the same arc. And all that generally happens in three acts.
Act 1: Capability Negotiation
Before any certificates change hands, both sides need to establish what they can do.
The Requester sends “GET_CAPABILITIES.” The Responder replies with “CAPABILITIES,” a bitmask that declares what it supports like which hash algorithms, which asymmetric crypto, whether it can do measurements, and whether it supports sessions.
Then comes “NEGOTIATE_ALGORITHMS.” Both sides compare what they support and agree on a common set of cryptographic algorithms. SHA-384 over SHA-256 if both support it. ECDSA over RSA where possible.
Act 2: Certificate Exchange
Now the Responder’s turn to prove itself.
The Requester sends “GET_DIGESTS,” asking for hashes of the Responder’s certificate slots. If something looks worth inspecting, it follows up with “GET_CERTIFICATE.” The Responder returns its full certificate chain, leaf cert, intermediates, up to a root provisioned at manufacture, typically tied to the device vendor’s PKI.
The Requester validates the certificate chain..
Act 3: Challenge-Response
A valid certificate proves identity. That’s what “CHALLENGE” solves.
The Requester sends a fresh nonce, a randomly generated value. The Responder signs it, along with a hash of its measurement digest, using its private key. Returns it in “CHALLENGE_AUTH.”
The Requester verifies the signature. If it checks out, the device is who it claims, it holds the private key, and its firmware state is known.
Where SPDM is Showing Up
Across the datacenter hardware stack, components that were previously trusted implicitly are now being asked to prove themselves. Here’s where that’s playing out.
- PCIe Devices
GPUs, SmartNICs, CXL memory expanders, and anything sitting on the PCIe bus is a candidate.
The transport here is PCIe DOE (Data Object Exchange), a mailbox mechanism built into PCIe 5.0/6.0 that lets the host send SPDM messages directly to a device without any sideband channel. Authentication happens over the same link the device uses for everything else.
NVIDIA, AMD, and Broadcom have all shipped or announced SPDM support in their datacenter hardware.
- NVMe Drives
An NVMe drive sits deep in the trust chain. It holds the data, it runs its own controller firmware, and it’s frequently swapped during maintenance.
DMTF’s DSP0286 defines the SPDM-to-storage binding specifically for this. The host can authenticate the drive, attest its firmware version, and detect if a drive has been substituted or tampered with.
- BMC-to-Component Authentication
This is the less obvious deployment, and arguably the most important one.
The BMC manages the platform out of band. It needs to trust the components it’s talking to, like power controllers, VRs, retimers and FPGAs, before the host CPU even boots. SPDM over MCTP gives the BMC a standardized way to authenticate those components during pre-boot, using the sideband fabric.
The common thread across all is that every deployment is solving the same problem at a different layer of the stack. The protocol stays the same. The transport adapts.
Which brings us to the most interesting transport combination in the spec.
The Stack: SPDM over MCTP over I3C
When engineers first encounter this stack, the reaction is usually “why three layers?”
It’s a fair question. The answer makes sense once you think about what a BMC is actually trying to do.
The problem with waiting for PCIe
BMC manages the platform, often before the host CPU has finished booting. PCIe isn’t up yet. DOE isn’t available. The BMC needs a sideband path to components, and it needs it early.
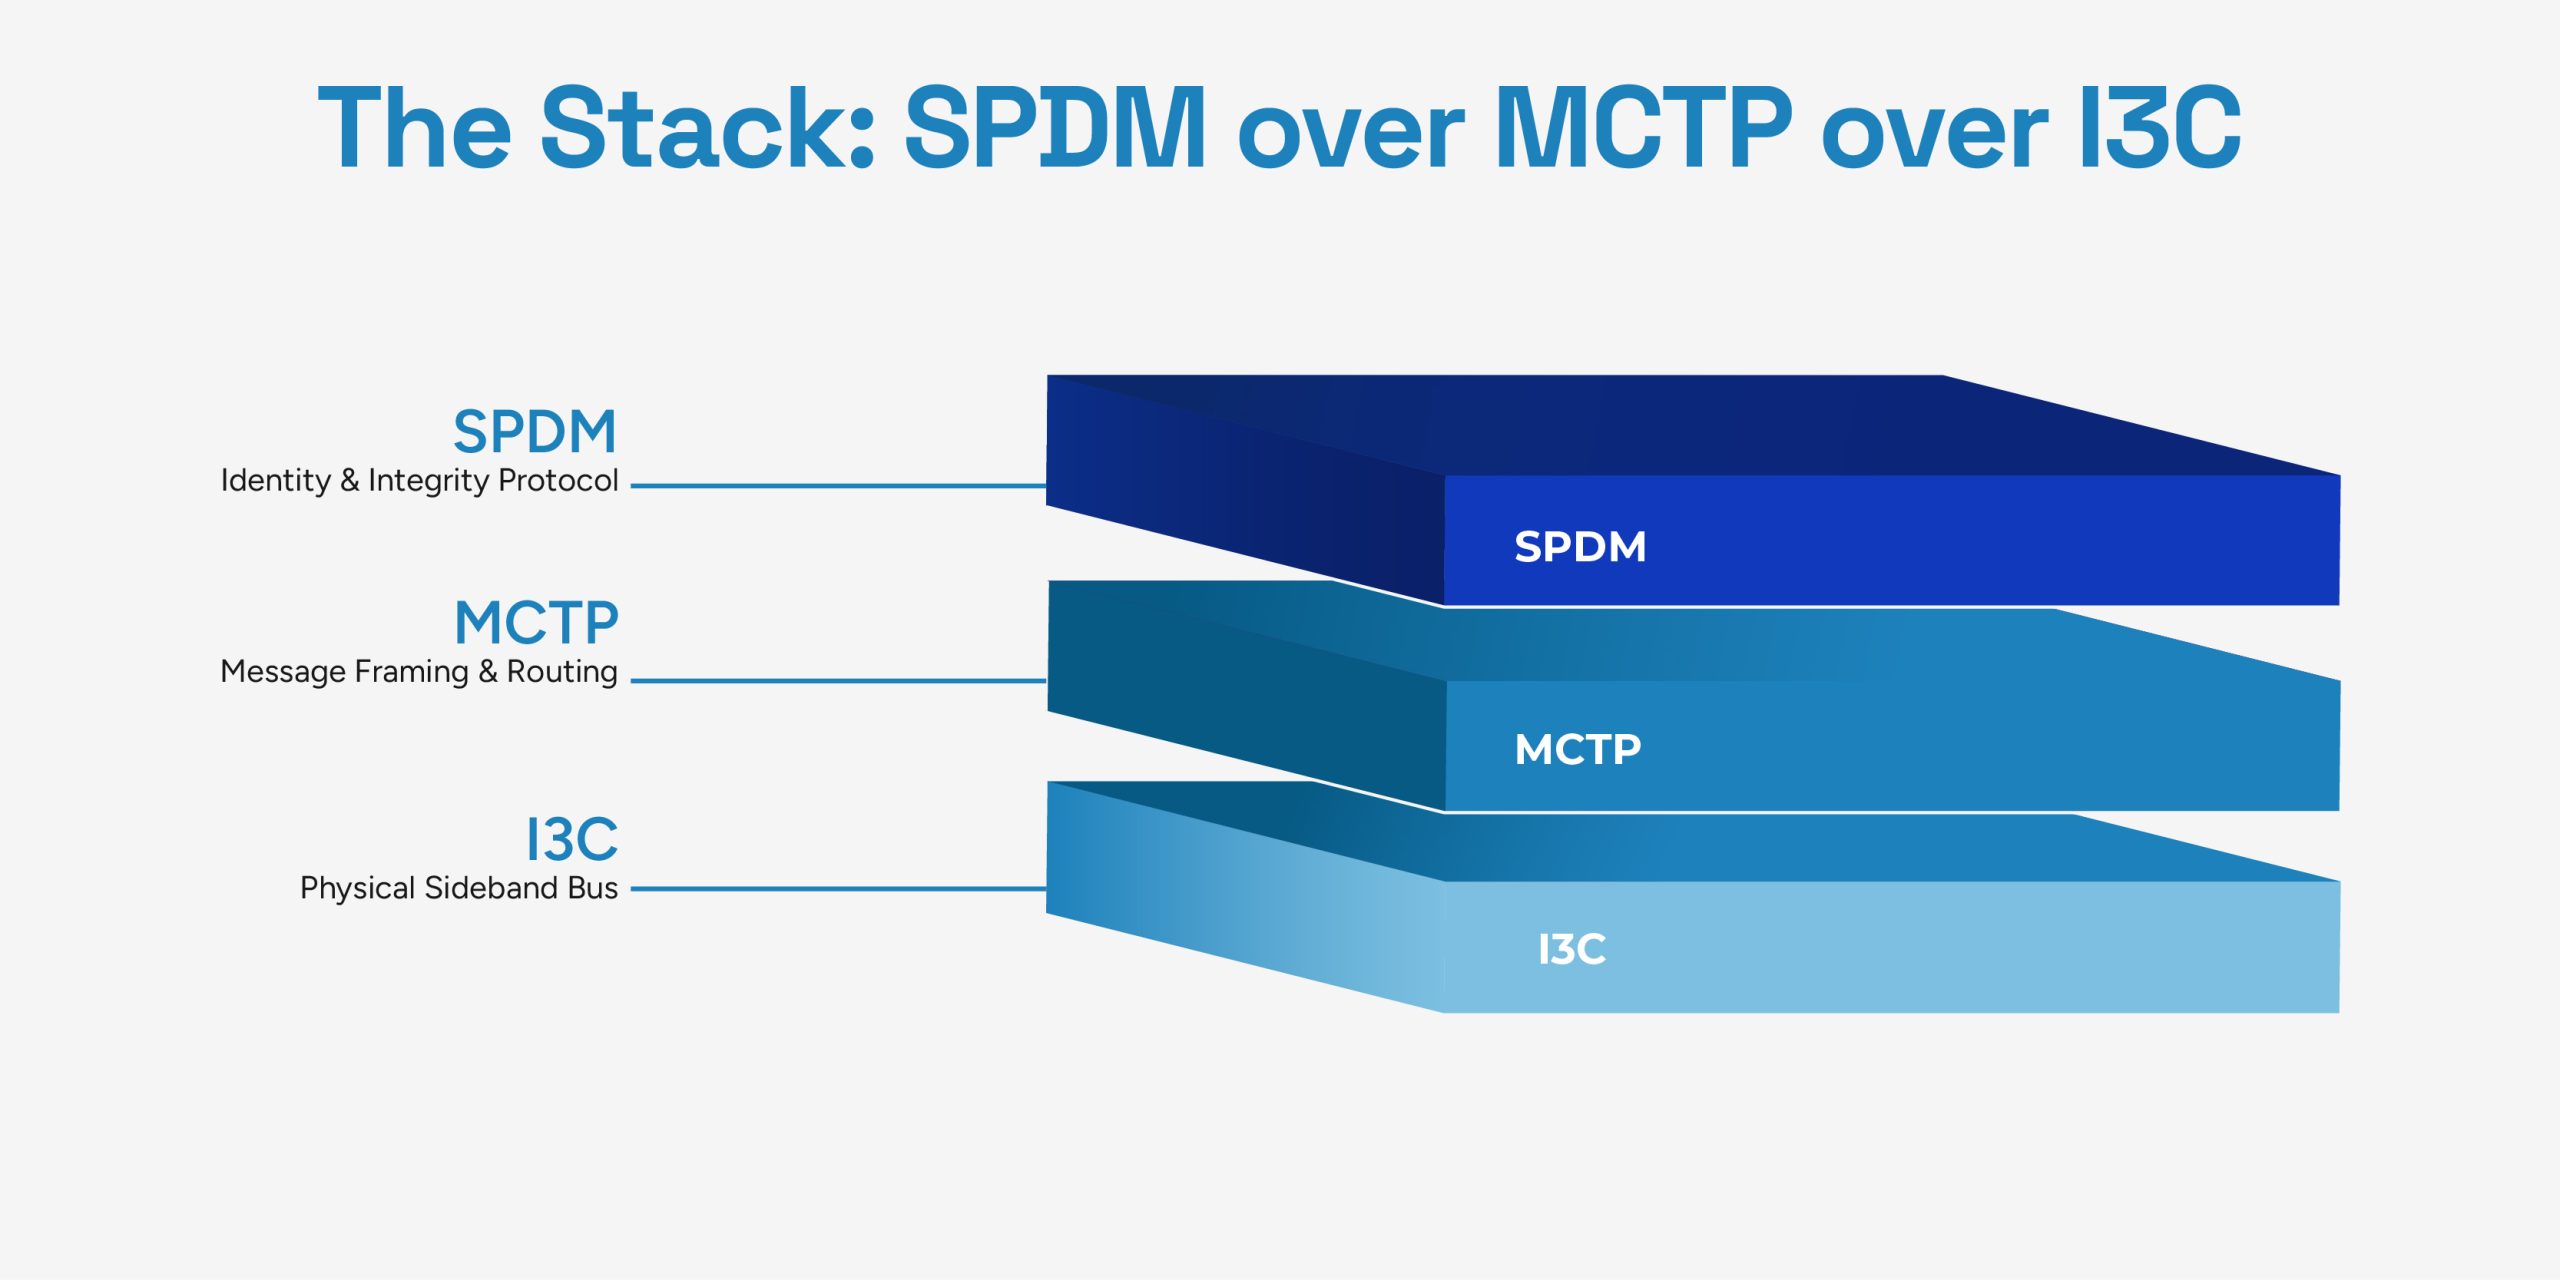
That’s what this stack is built for. Each layer has one job.
I3C is the physical bus. It’s how the BMC physically reaches components on the board. Low pin count, low power, designed for exactly this kind of sideband management traffic.
MCTP sits on top. It does message framing and routing. And breaks SPDM payloads into packets, handles addressing, and reassembles at the other end. Critically, MCTP is transport-agnostic. The same MCTP layer runs over I3C, PCIe, SMBus, or USB. The SPDM messages above it don’t change at all.
SPDM rides on top of MCTP, completely unaware of what’s underneath. It sends “GET_CAPABILITIES,” “GET_CERTIFICATE,” “CHALLENGE,” exactly as it would over any other transport.
Why this matters at bring-up
Consider what this enables: a BMC can run a full SPDM handshake with a PCIe retimer over I3C during early boot before the host ever sees the device. By the time the OS comes up, trust is already established.
When SPDM Goes Wrong
SPDM failures are quiet. There’s no crash or kernel panic. The handshake just doesn’t complete.
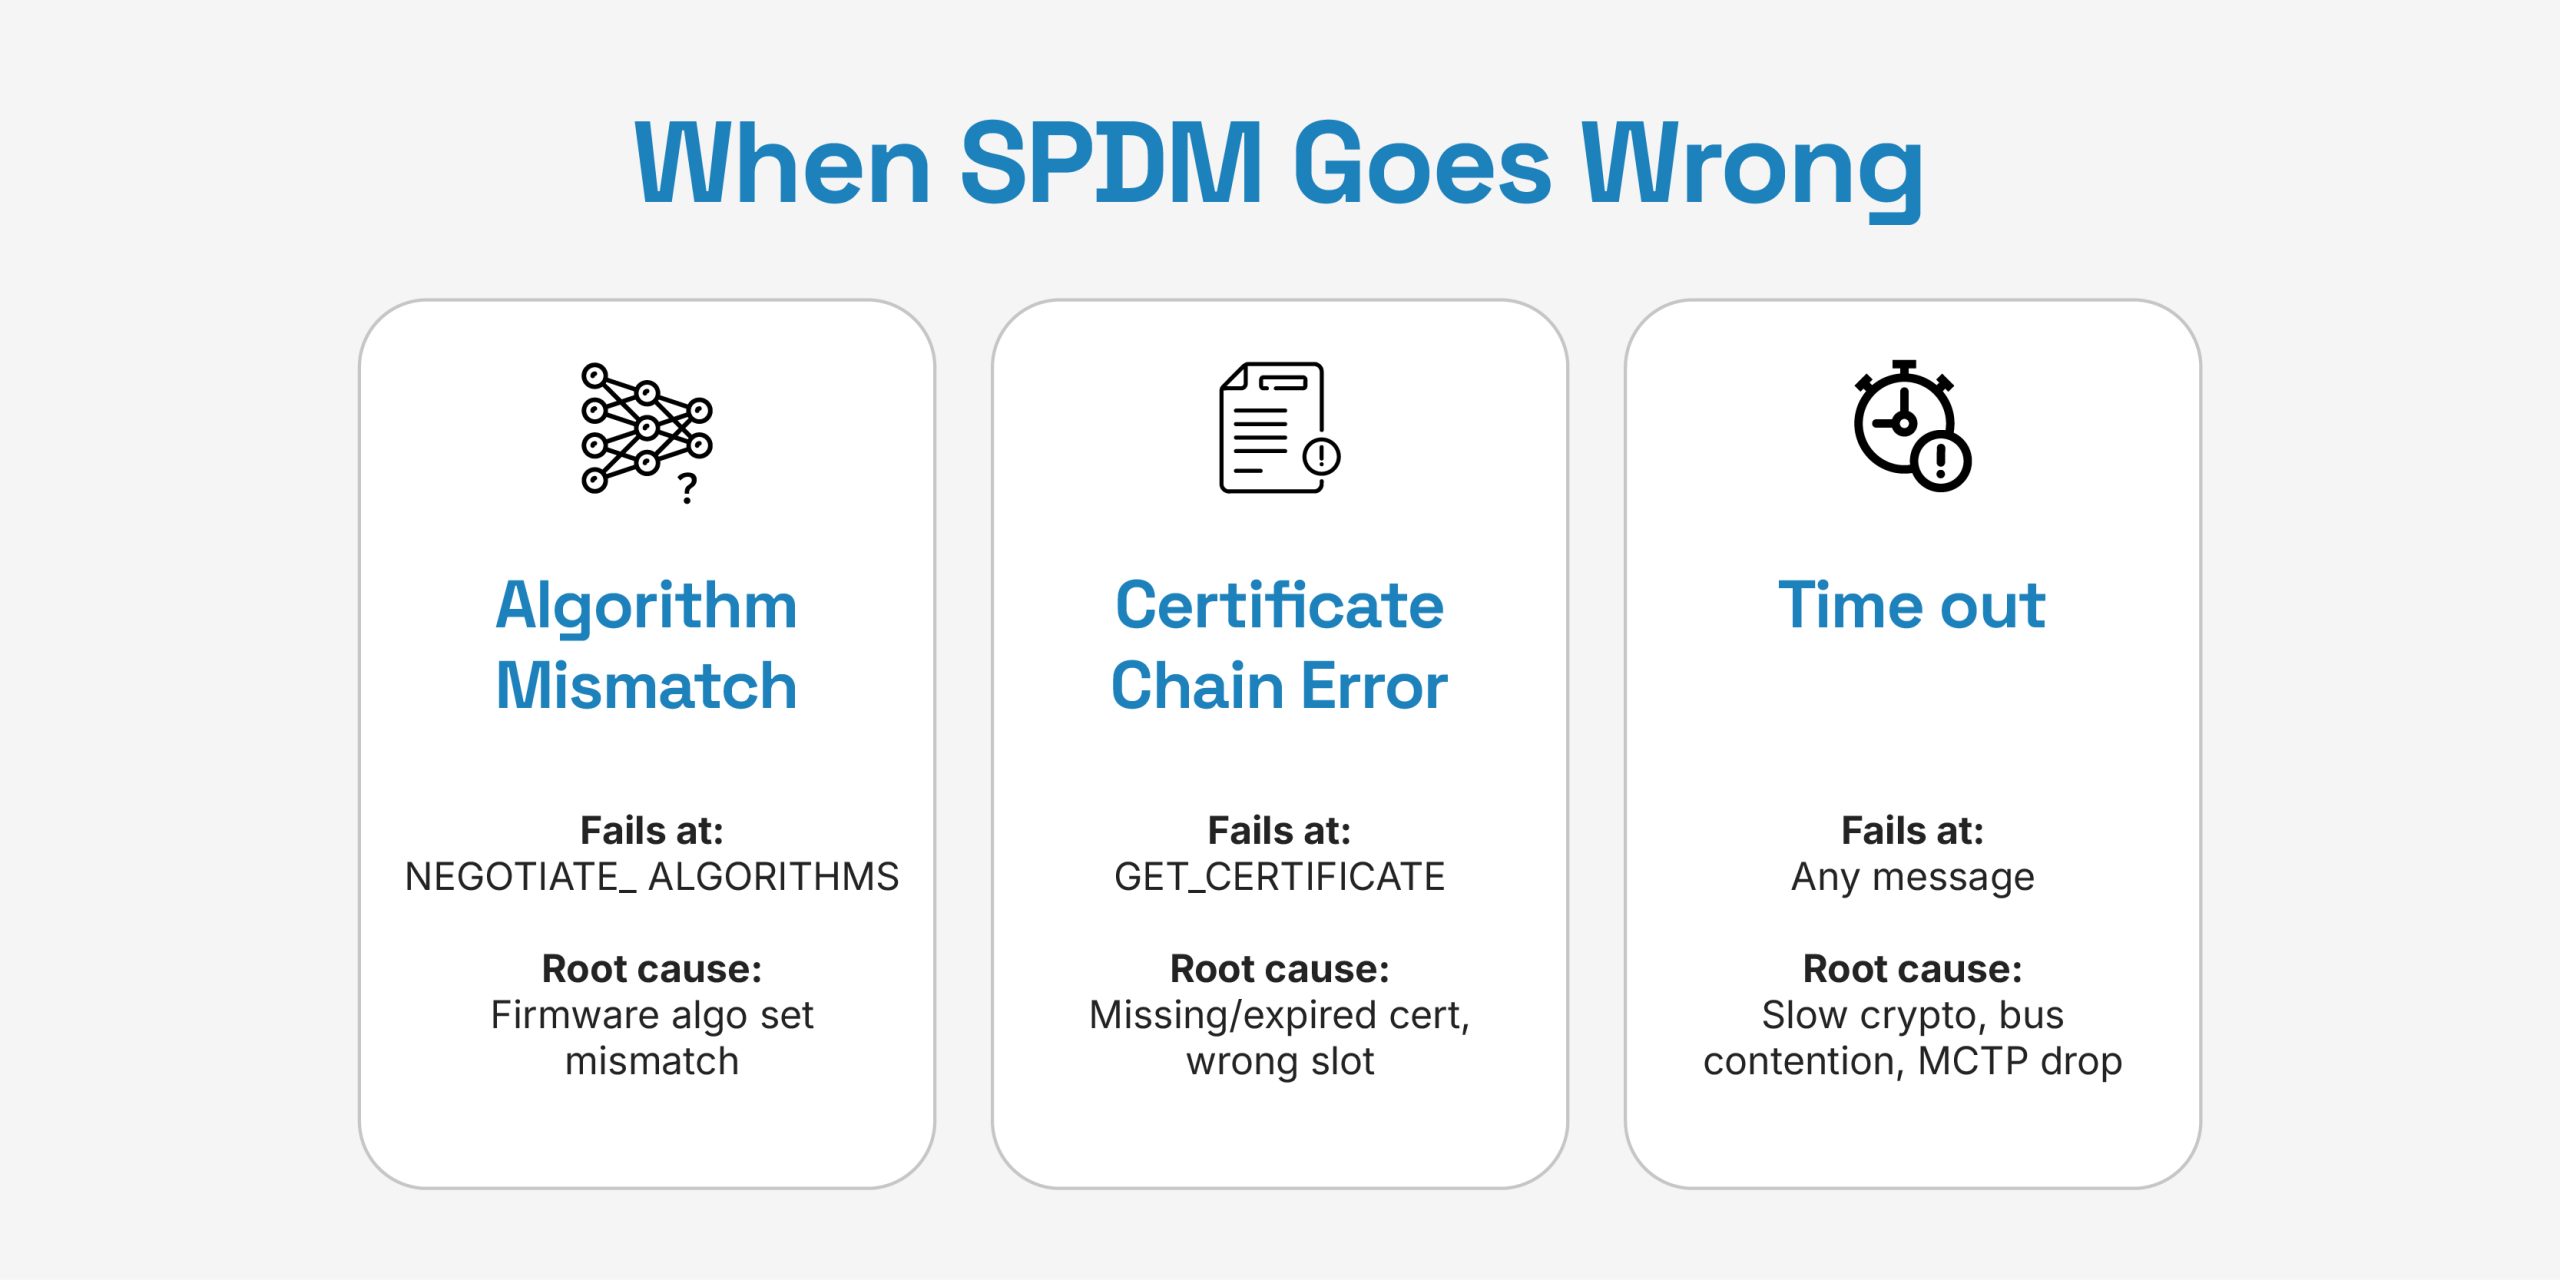
These are the three failure modes engineers hit most often.
- Algorithm Mismatch
It starts in Act 1, during capability negotiation.
The Requester and Responder exchange their supported algorithms. If the intersection is empty, or if one side advertises a capability it can’t actually execute, “NEGOTIATE_ALGORITHMS” fails and the session never progresses.
In practice, this usually means one side is running an older firmware with a limited algorithm set.
- Certificate Chain Error
This one shows up during “GET_CERTIFICATE,” and it has more failure modes than most engineers expect.
- Missing intermediate cert in the chain
- Leaf cert signed by a CA the Requester doesn’t have in its trust store
- Expired certificate on a device that’s been sitting in inventory
- Certificate slot mismatch, Requester asks for slot 0, device has its identity in slot 1
Each of these produces a different error code in the “ERROR” response.
Timeout
The most common. The least informative.
The Requester sends a message. The Responder doesn’t reply within the expected window.
Common causes:
- Responder firmware is doing crypto on a slow or underpowered engine. ECDSA signature generation on constrained hardware takes time
- MCTP fragmentation isn’t being handled correctly, packets are getting dropped mid-reassembly
- I3C bus contention, another master is holding the bus when the Requester needs a response
Timeout without context is almost useless. Timeout with a bus trace tells you exactly where things stalled.
SPDM gives you the diagnostic information. You have to be set up to read it.
Validation During Bring-Up
Getting SPDM right on paper is one thing. Proving it works on your actual hardware is another. Bring-up is where theory meets the bus. And the bus rarely behaves exactly as specified.
Start with spdm-dump
DMTF’s open-source spdm-dump tool is the first stop. Feed it a captured SPDM message trace, and it decodes the full exchange, message types, algorithm selections, certificate fields, nonce values and signature verification results. It won’t tell you why the I3C bus dropped a packet, but it will tell you exactly what SPDM-level state both sides were in when things went wrong.
Good for confirming the message sequence is structurally correct, catching cert chain issues, validating algorithm negotiation. But it’s not good for anything below the SPDM layer.
Then you need to see the bus
Most SPDM failures in real hardware aren’t SPDM failures at all. They’re I3C framing errors, MCTP reassembly drops, or timing violations that look like timeouts one layer up.
That’s where you need visibility into the full stack, I3C frames, MCTP transport, and SPDM messages, correlated in a single view, at real bus speeds.
This is exactly what Prodigy Technovations’ PGY-I3C-EX-PD is built for. It’s a hardware-based I3C Protocol Exerciser and Analyzer that decodes the complete SPDM over MCTP over I3C stack in one place. You can see the I3C timing diagram, the MCTP framing, and the SPDM message decode, correlated together, in the same window.
What makes it especially useful during bring-up:
- Exerciser mode: Emulate an I3C controller or target to drive SPDM traffic to your DUT, without needing the full system up
- SPDM-CTS: Run DMTF’s SPDM Conformance Test Suite directly from the tool, at the click of a button
- Error injection: CRC errors, ACK/NACK, and parity faults stress the stack deliberately before it breaks in the field
It also handles MCTP-CTS and NVMe-MI-CTS, so if your BMC is authenticating NVMe drives over I3C, you’re validating the entire management stack.
When all three acts of the message sequence complete cleanly, and you’ve confirmed it with the bus trace to back it up, that’s bring-up done right.
All the components that boot without verified identity are a gap in your trust chain. SPDM prevents that, but only if your implementation is solid.
Prodigy’s PGY-I3C-EX-PD makes sure it is, from the first packet on the bus to the final conformance report.